Star Trails Pocket Guide
How to photograph star trails, from camera settings to post-processing techniques.
By Reed Colloton
·
October 10th, 2025
Overview
Instead of taking one long photo, you'll capture a series of 30 second exposures over 30 mins to 2 hours. If a satellite or airplane flies through one of your shots, you can remove it from that single frame later.
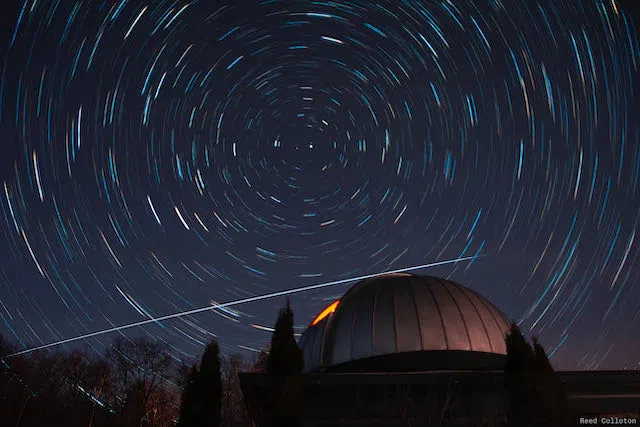
17mm • 60 photos • 30 sec • f/2.8 • ISO 800 • Dublin Observatory, NH
Ingredients
- Camera (acclimated to temp) — Acclimate outside before in summer weather.
- Wide-Angle Prime Lens — 14-35mm full frame (9-24mm APS-C) f/1.4-2.8 lens recommended.
- Tripod — Necessary.
- Warm clothes — You'll get cold not moving around.
- Flashlight, red headlamp — When light-painting landscapes and walking around the camera.
- Extra batteries — Batteries don't last as long in the cold.
Optional
- Intervalometer (or remote trigger) — For cameras without built-in interval shooting.
- Lens warmer (or hand warmer) — Prevents lens fogging in cold weather.
- Photo editing software — Photoshop, StarStaX, etc., for stacking.
Timing
- Few clouds and new/set moon
- Compose with Polaris (the North Star)
- Use interesting foreground objects.
Shooting
1
Manual Focus on a Bright Star.
Use your camera's "live view" screen, digitally zoom in on the
brightest star you can find, and carefully turn your lens's focus
ring until that star appears the smallest. Without live view, take
test shots until the stars look sharp.
2
Widest Aperture
Set your lens to its widest sharp aperture (for example, f/2.0 on
an f/1.8 lens) to gather the maximum amount of light in each
photo. Newer lenses can be shot wide open.
3
Shutter Speed to 30 Seconds
30 sec to 2 mins exposure to capture plenty of
starlight in a single frame without the stars beginning to trail
within that individual photo.
4
Set Your ISO
Take a few practice photos to find the highest ISO you can use
without introducing too much noise. Don't worry too much about
noise; it will be reduced with stacking.
5
Turn OFF Long Exposure Noise Reduction
This setting will cause your camera to pause for a long time
between each shot. This will create noticeable and unsightly gaps
in your final star trails.
6
Interval Shooting
Use your camera's interval shooting mode with the shortest delay
or use a trigger/intervalometer.
7
Shoot in RAW
Give yourself the most flexibility when editing.
8
Turn off auto white balance
Make it easier when editing.
9
Monitor for Lens Fogging
If your lens starts to fog up, clean it off. Consider using a lens
warmer or hand warmer.
30 sec | f/1.8 | medium-high ISO
Advanced Tip: Sharp Landscape
Take one exposure specifically for the landscape.
| Settings | Star Trail Photos | Landscape Photo |
|---|---|---|
| Exposure Time | 30 seconds | Longer (until wind blurs trees) |
| Aperture | Wide open | Narrower |
| ISO | High | Low |
Editing
Stacking
- Remove Transients: Remove planes and satellites from the individual image with a remove tool.
- Stack all the Images: Use the photoshop lighten blending mode. Or use a free program like StarStaX.
- (Advanced) Fix Gaps: Rotate the sky to remove gaps in trails if they exist.
Nightscape
- Mask the Landscape Exposure: Edit the landscape until it feels realistic.
- Combine with the Sky: Overlay the landscape on top of the sky.
Final Edits
- Noise Reduction: Helpful even though stacking reduces noise.
- White Balance: Adjust the white balance so the sky looks natural.